Friday, June 25, 2010

Roasting Thermometer

If you don't have one of these thermometers, you are REALLY missing out (not to mention making things way too hard on yourself). Forget about guessing how much longer until the Thanksgiving turkey's cheap thermometer pops up. Stop cutting into your roasted chicken or steak to see if the middle is done yet. With one of these bad boys, you just set the alert temperature on the display unit, stick the probe in the meat, put the meat in the oven or on the grill and sit back and relax until the internal temperature reaches the desired setting.

Go ahead and treat yourself to something nice...you (and your dinner guests) deserve it. It'll be the best $20 you'll ever spend on a kitchen gadget.

Tri-tip Tacos

I have to admit that tri-tip is a new discovery for me. Sure, I've heard people mention how much they love tri-tip, but I never tried cooking one...until last weekend. Now I am hooked and don't think I'll spend much money on any other cuts of beef anytime soon. If cooked and cut correctly (which ain't very hard at all), this is about as good as beef gets.

My personal favorite so far is to slice it thin and throw it into a soft, toasted corn tortilla along with my favorite taco fixin's (black beans, avocado, cilantro, diced onion, cilantro dressing, and a squeeze of lime).


Ingredients:
2-3 lbs Tri-tip roast (pre-marinated from Costco are tasty and fool-proof)
Seasoning to taste (i.e. Salt & pepper, Spade L Ranch dry rub, etc.)
Soft corn tortillas
Taco fixin's

Directions:
Step 1: Preheat one side of a barbeque grill on high.

Step 2: Trim off any unwanted fat from the outside of the tri-tip. Pat dry, and then liberally apply your favorite seasoning (unless using a pre-marinated roast).


Step 3: Sear the roast on all sides over high heat until dark brown, then move off the direct heat and slowly roast until internal temperature reaches 135 degrees (after the meat rests, it will climb to around 140-145 degrees for a perfect medium-rare to medium internal temperature).


Step 4: Remove roast from grill, cover tightly with aluminum foil and let rest for 15 minutes before slicing.


Step 5: Toast soft corn tortillas on the grill for one or two minutes per side, then remove from grill and cover with damp towel to keep warm and moist.


Step 6: Thinly slice the roast across the grain, put a couple of slices in each tortilla, and garnish with whatever taco fixin's tickle your fancy.

Tuesday, March 9, 2010

Peeling Boiled Potatoes

Who doesn't love a clever little cooking tip from time to time? Still not interested? Well, how about a clever little cooking tip from an overly cheesy, washed-up TV personality? This clip may not win any acedemy awards, but at least it will help you peel your next batch of boiled potatoes.

Wednesday, November 18, 2009

Lemon Roasted Turkey

I posted a turkey recipe a few years ago that is absolutely fabulous, but you have to set aside quite of bit of time to do it right. Some people have asked for recipes that are a little more simple to make. This is one is really simple to make but will still provide a "wow factor" at your Thanksgiving Feast!

Ingredients:
1 whole turkey
1 large lemon, cut into halves
Salt and pepper to taste
Butter or olive oil, whichever you prefer

Directions:
Step 1: Heat oven to 350 degrees.

Step 2: Rub butter or oil over the skin of the turkey until it is completely coated and sprinkle with salt and pepper (and any other seasonings you prefer).

Step 3: Use your hand to gently separate the skin from the breast meat. Slide lemon halves under the skin with the peel side up, one on each side. The lemons will release their juices into the breasts slowly as the turkey cooks.

Step 4: Cover with foil and bake for 30-45 minuters.

Step 5: Remove foil and continue to bake until the temperature in the thickest part of the breast registers 160 degress.

Step 6: Remove from oven, cover with foil and let stand for 20-30 minutes before carving.


NOTE: If you've followed these steps correctly, your turkey should look like the one in the picture below.


Friday, September 4, 2009

Gimmie My Baby Backs!

Does the global recession have you strapped for cash? Well, it's your lucky day because you've just stumbled onto a Baby Back Bail-out of epic proportions (and it doesn't even involve any government paperwork or blood-sucking politicians)! Did you know that you can make a huge rack of ribs at home, for 2-3 people, for about half of the price of a full rack at almost any barbeque restaurant? Well, now you know.

Not only are these ribs relatively inexpensive, they are also fall-off-the-bone tender and dead simple to make! The ribs in the picture are only HALF of the slab that I bought at Harmon's for $16. I'm sure you could get the same amount of ribs at Costco or Sam's for $10-12. Not too shabby for some wicked awesome, tender ribs that will feed two hunrgy carnivores!


Ingredients:
1 rack of baby back ribs
2-4 tbsp dry rub (I suggest Spade L Ranch)
1/2 cup of your favorite BBQ sauce

Directions:
Step 1: (Optional) Remove membrane on the bottom side of the ribs. (It's a little tricky to get started, but then just peels right off)

Step 2: Evenly coat top and bottom of ribs with dry rub and half of the BBQ sauce. I used the Spade L Ranch seasoning that is usually found over by the butcher's counter in the grocery store (click on the link to see where you can buy it in your area).

Step 3: Wrap the ribs tighly in a few layers aluminum foil. Place the ribs in the fridge for at least 1 hour (or up to 24 hours).

Step 4: Preheat oven to 400 degrees, place the wrapped ribs (bottom side up) on a rimmed baking sheet into the oven. After about 10 minutes, lower heat to 225-250 degrees and cook for 2-3 hours.

Step 5: Remove ribs from oven and let stand for about 15 minutes before removing the foil and plastic wrap.

Step 6: Heat up the barbeque grill on high, baste the ribs with another layer of bbq sauce and begin to evenly brown the ribs on both sides. Add additional layers of bbq sauce every 3-5 minutes and continue to cook until slightly charred (to taste).


Friday, July 10, 2009

Nutty Green Beans

This recipe came straight out of the saddle bag of Boise's most notorious and utterly dominating Alleycat Bike Racer chick. Can you say dead simple and super-tasty? Try it out and you might just get hooked. I made half batches each time instead of using the entire bag and it worked out great. If you make a full batch will be need to have a really large saute pan (or possibly an electric skillet).

Ingredients:
1 2 lbs. package of fresh French Green Beans (Costco has been carrying them in their walk in cooler for about $5)
1-2 Tbsp butter

1-2 Tbsp olive oil
2-3 Tbsp toasted pine nuts or sliced almonds
Salt and pepper to taste

Directions:
Step 1: Melt butter and oil in large saute pan over medium heat.

Step 2: Add the entire package of green beans, stir or toss them until evenly coated. Add salt and pepper and then cover with the lid. Stir them occasionally to brown evenly, otherwise leave the lid on and let them cook for 20-30 minutes.

Step 3: Add nuts with about 5 minutes of the cooking time remaining. The more wilted and browned the beans look, the better they taste!

Makes 4 servings


Perfect Scrambled Eggs

Gordon Ramsey can be a bit of a "wanker" on some of his TV shows, but the guy can flat out cook. Check out this video for perfect scrambled eggs and then give it
a try. I've made these several times and they are great. I always use sour cream
instead of creme fraiche because, honestly, who has creme fraiche other than
Whole Foods Yuppies, professional chefs and the occasional Food Network talking
head?!

Once you have the concept down, it is pretty easy to just make your scrambled eggs as you normally would, but pull them off of the heat about 15-20 seconds from when they look done, throw in a spoonful of sour cream, and stir it in to stop them from over-cooking. Add chives if you'd like, but I usually just roll with salt and pepper.


Wednesday, February 25, 2009

Kicked-up Ketchup

I recently got a great tip from a friend on how to spice ketchup up a bit. This is definitely a killer combo for those who like things a little spicy. I tried it out last night on some hash browns and eggs and it was friggin' awesome. I hear it is also rather tasty when baked on the top of meatloaf. Thanks for the idea Adri!

Directions:

Step 1: Pour 1/2 cup of ketchup in a small bowl or cup.


Step 2: Mix in 2-3 teaspoons Sriracha Chili Sauce.

Step 3: Substitute your spicy "fine herb sauce" in the place of ketchup on pretty much anything!

Monday, November 24, 2008

Talkin' Turkey


Are you scrambling to try and some last-minute ideas for your Thanksgiving Feast? If so, be sure to check out the TKRC November 2007 post for one of the tastiest Roasted Turkey recipes on the world wide web!!

Wednesday, November 5, 2008

Juicy Well-Done Burgers

I saw this recipe on America’s Test Kitchen (ATK) the other day and thought it looked pretty great and really easy. Here’s what they have to say about burgers:

Taste tests proved that well-done burgers made with 80 percent lean chuck were noticeably moister than burgers made from leaner beef, but they still weren't juicy enough. Adding a panade (a paste of bread and milk paste) to the ground beef creates burgers that are juicy and tender even when well-done. To punch up the flavor, we also added minced garlic and tangy steak sauce.

To keep our burgers from puffing up the way most burgers do, we made use of a previous test kitchen discovery: If you make a slight depression in the center of the patty, it will puff slightly as it cooks and level out to form a flat top.

Serves 4

Ingredients:
1 large slice high-quality white sandwich bread , crust removed and discarded, bread chopped into 1/4-inch pieces (about 1/2 cup)
2 tablespoons whole milk
3/4 teaspoon table salt
3/4 teaspoon ground black pepper
1 medium clove garlic , minced or pressed through a garlic press (about 1 teaspoon)
2 teaspoons steak sauce , such as A-1
1 1/2 pounds 80 percent lean ground chuck
6 ounces cheese , sliced, (optional)
4 hamburger buns or rolls

Directions:
Step 1: Mash bread and milk in large bowl with fork until homogeneous (you should have about 1/4 cup). Stir in salt, pepper, garlic, and steak sauce.

Step 2: Break up beef into small pieces over bread mixture. Using fork or hands, lightly mix together until mixture forms cohesive mass. Divide meat into 4 equal portions. Gently toss one portion of meat back and forth between hands to form loose ball. Gently flatten into 3/4-inch-thick patty that measures about 4 1/2 inches in diameter. Press center of patty down with fingertips until it is about 1/2 inch thick, creating a slight depression in each patty. Repeat with remaining portions of meat.

Step 3: Grill burgers on hot grill, uncovered, until well seared on first side, 2 to 4 minutes. Flip burgers and continue grilling, about 3 minutes for medium-well or 4 minutes for well-done. Place cheese (optional) on each of the burgers about 2 minutes before they reach desired doneness, covering burgers with disposable aluminum pan to melt cheese.


Step 4: While burgers grill, toast buns on cooler side of grill, rotating buns as necessary to toast evenly. Serve burgers on toasted buns.

Tuesday, August 19, 2008

Is Cafe Rio being shady?

I love Cafe Rio just as much as the next guy. They are extremely efficient in everything they do. It seems that no other restaurant chain has figured out how to move people through the line anywhere close to as fast as Cafe Rio. In fact, Cafe Rio makes the Toyota Production System look like it is moving in slow-motion. I appreciate and admire efficiency, but I love tasty food.

Which brings me to my point: I could eat a Cafe Rio pork salad almost every day of the week...just not if I wanted to stay somewhat healthy. But don't tell anyone. Let's keep it our little secret.


You see, Cafe Rio doesn't think it is important enough to provide relavant information to customers. However, you can go to their website (http://www.caferio.com/) and read all about the company's history. Make sure to save enough time to browse through the fascinating corporate executives' bios. You can also click through the entire menu, look up the daily specials and have peace of mind knowing that everything they make is super fresh...just don't waste any of your time trying to find nutrional information.

You can get "nutritional" information at McDonald's, Burger King, Taco Bell, Del Taco and Subway (just to name a few), but not at Cafe Rio. I guess they figure you are on a "need-to-know" basis...

I'm sure it's just a simple oversight. Nothing more than an honest mistake. Maybe they just haven't had the time to get around to figuring it out. Lucky for them, there are people out there who like to do this sort of stuff (probably in between games of Dungeons and Dragons). I found one guy's attempt (http://theboard.byu.edu/?area=viewall&id=36426) that seemed pretty reasonable to me.

Which makes me that much more suspicious about Cafe Rio not providing the real information in the first place. Are they afraid of what their restaurants would look like if people knew the salad they were about to order had 1,300+ calories?


Just to put that in perspective, NOTHING on Burger King's menu is over 1,300 calories. The Triple Whopper weighs in at 1,090; add cheese and you are still "only" at 1,250.

Wouldn't it be cool if somebody did a ground-breaking documentary about eating three meals a day at Cafe Rio for a month. Does anybody know how to say "Super-Size Me" in Spanish? Is that what it is going to take for people to realize what they are really getting at Utah's favorite fresh mexican restaurant? Maybe then, and only then, will people find a new place to flock to like moths to a porch light. I hope that day comes soon. I'd really love to be able to sit and eat my pork salad in peace and quiet for a change.

Monday, August 18, 2008

Cheese Addiction

I went to New York City last year on business. Well, sort of. I should say I went to New York to visit a store, but work just happened to pay for the trip because there was a conference being held that I needed to attend. I didn't want to visit just any store, I was on a mission to find a cheese shop: Murray's.

Murray's is a pretty well-known place for people who are into cheese. If I won the lottery, I would want to open up a cheese shop like Murray's and spend the rest of my days mastering the techinques of making world-class cheese. At least that's how the dream plays out in my head. In reality, I'd probably tire of making cheese after a while and end up just playing golf every day, but that's missing the point.

You see, I have a problem. I am addicted to cheese. Addiction sometimes makes people do strange things. Let me explain. I had never been to NYC before. I was only in town for two days, one of which was completely booked with conference activities. My flight back home left in the evening of the second day, so I didn't have time to see much. Fortunately, I had a plan.

Step 1: Wake up early and find something quick to eat for breakfast.

Step 2: Figure out NYC's public transportation system.

Step 3: Navigate my way through the never-ending maze of subways, people, cars and buildings until I arrived at Murray's.


Step 4: Take a deep breath upon entering the store. Linger for an hour or so and sample as much imported cheese as possible. Buy some stinky cheese to take back home.


Step 5: Race around Manhattan like a mad man for the remaining few hours to see (in the following order) Lombardi's Pizzeria, Canal Street, Ground Zero, the Statue of Liberty and Grand Central Station.

Step 6: Try not to lose the cheese.

The rest of the day was pretty much a blur. I arrived at JFK just in time to catch my flight home. I was exhausted, hungry and ready to go to sleep. I closed my eyes and laid my head back on the seat. And then the smell hit me. The cheese was wrapped in two layers of butcher's paper, three layers of plastic bags, stuffed into my carry-on suitcase and locked in the over-head compartment. But apparently that wasn't enough. I took a deep breath and smiled.


I may have missed out on what much of what NYC has to offer, but at least I had found what I was looking for.

Saturday, August 2, 2008

August 2008 ROM - TK's Burger Mix


TK’s Burger Mix

Summer just isn’t complete without a few really good BBQs, and a really good BBQ isn’t too hard to pull off if you have a super tasty burger mix. You don’t have a good burger mix, you say? Well then, you have come to the right place. Let’s begin:

Yield:
Approx. 6 large patties

Ingredients:
2 lbs. fresh ground hamburger meat
1 egg, beaten
1/2 medium, yellow onion, pureed in food processor until smooth
3 green onions, finely sliced
2 Tbsp. steak sauce
1 Tbsp. Worcestershire sauce
1 slice of toast, ground into course breadcrumbs in food processor
1 package of Liption onion soup mix (optional)
Course kosher salt and fresh-ground black pepper

Directions:
Step 1: Combine eggs, onions (yellow and green), steak sauce and Worcestershire sauce (and soup mix, if used) in a large mixing bowl. Stir in breadcrumbs and let sit for a few minutes.

Step 2: Add hamburger to mixing bowl and mix until everything has been incorporated. Store mixture in refrigerator until 30 minutes prior to cooking.

Step 3: Evenly divide mixture and form thick, hand-made patties. Heavily season outside of each patty with coarse kosher salt and fresh-ground black pepper.

Note: Don’t be shy with the seasoning because there is purposely no salt or pepper on the inside of the meat. Coarse kosher salt is less salty than table salt and the seasoning will form a nice crust on the patties as they grill, which adds awesome flavor and texture.

Step 4: Preheat grill on high for 20 minutes before cooking. Cook over medium-high or high heat until a nice crust is formed (3-5 minutes per side) and there is just a little pink left in the center. Remove patties from the grill, cover with aluminum foil, and let them rest for 5 minutes before serving.

TK’s tip: Put the patties on the grill and don’t touch or move them until they are cooked on the first side. Flip them over once and don’t move them again until they are ready to take off the grill. NEVER squeeze them with the spatula and resist the urge to keep flipping them over. The less you bother them the juicier they will be.

Wednesday, July 23, 2008

Is it Impossible?


Am I the only one that has noticed that it is darn near impossible to eat an entire bag of microwave popcorn without dropping or spilling at least one piece?

No matter how hard I try, at least one piece always seems to hit the corner of my mouth or fall out of my hand. Yesterday, I popped a bag before leaving work and was carelessly snacking away while driving to the gas station. As I was getting close to the bottom of the bag I suddenly realized I was on track to eat the perfect bag. I guess the magnitude of the moment got to me. I cracked under the pressure and dropped a piece. I watched it fall (seemingly in slow-motion) onto the seat. It landed with an audible "thud".

Maybe eating the perfect bag it is like pitching a no-hitter or hitting a hole-in-one. You'll screw it up if you think about it too much or try too hard. You might even drive yourself crazy chasing after it. I suppose it will happen for me one of these days...and I probably won't even notice.

Thursday, July 17, 2008

I know, I know...

So I've been slackin' about getting a recipe posted for the July recipe of the month....but I have a somewhat valid excuse. I've been out of town on vacation and business quite a bit this month. I am also trying to endure a managerial economics class that combines all the "greatest hits" from macroeconomics and calculus. It's just as much fun as it sounds.

I actually have a few really good recipes in the works, but haven't had enough time to get them typed up just yet. So I'll wait until August to post an official recipe of the month because July is pretty much shot. Take this opportunity to browse through my previous posts from last summer and find something that you should have tried a long time ago!

For those of you out there in the blog-o-sphere that need something to tide you over until then, I can tell you how to make a really tasty sandwich. I’ll spare you most of the details because if you need step-by-step instructions on how to make a sandwich you probably lack the ability to read and are just here to look at the pretty pictures…

E-BLT

No, it’s not a sandwich you make on the Internet, it’s a BLT with a fried egg in it.

Directions:

Make two slices of toast, spread some mayo on one or both of the slices, cook up a few strips of bacon, fry an egg (leaving the yolk a little runny), throw on a couple thick slices of tomato and some lettuce. Try it. Love it.


Sunday, June 1, 2008

June 2008 ROM - Artisan Bread

Artisan Bread

Over the past few months I’ve been looking for a way to make rustic, european-style bread. I tried a couple different recipes, but the bread was not quite as good as I what I was after. Then I came across this “Master Recipe” from a couple of people that had supposedly perfected making artisan bread at home. They have a book called “Artisan Bread in Five Minutes a Day” which contains the Master Recipe and then hundreds of other variations of breads, rolls, etc.

I had to make the recipe a couple of times to get it just right, but now it is really almost a no-brainer and comes out great every time. One key that I found was to scoop a one-cup measuring cup into the flour and then use a knife to level it off. By scooping the flour into the measuring cup you pack more flour into each cup than when you spoon flour into the measuring cup. More flour results in a more stable dough that will hold its shape a little better than dough that has too little flour.

Once you have the Master Recipe down, it is easy to change things up a little and add some dried fruits, roasted garlic and herbs, or whatever you think would make a great loaf of bread. The recipe should easily make 3 or 4 one-pound loaves and can be kept stored in the refrigerator for up to two weeks so you can just take out a little dough at a time to make a fresh loaf each day. The only change I made was to add 2 tablespoons of honey to the recipe because it probably adds a little flavor and gives the yeast something eat so that the dough rises a little more quickly.

For more information, go to the authors’ blog at: http://www.artisanbreadinfive.com/ and watch their demonstration video at: http://www.startribune.com/video/11967361.html. The video is really helpful and shows just how simple this recipe is.

There are a few things that you should consider getting to make this recipe work really well, a pizza peel and a baking stone (or at least an unglazed ceramic tile from a home-improvement store). I bought a pizza peel a few years ago for under $10 and I was able to recently find a 13”x15” baking stone at a local baking store (Kitchen Kneads on Redwood around 75th South) for $20, and it’s been awesome for making bread and pizza.


Ingredients:
3 cups warm water
1 ½ Tbsp. coarse Kosher salt
1 ½ Tbsp. active yeast
2 Tbsp. honey
6 ½ - 7 cups white, unbleached flour, additional for dusting
Cornmeal for dusting
1 cup water

Directions:
Step 1: Mix warm water, salt, yeast and honey in a large bowl. Let stand for a few minutes.


Step 2: Add flour and mix with wooden spoon or spatula just until the flour is incorporated, about 1 minute. Cover bowl loosely with lid or plastic wrap and let stand at room temperature for 2-5 hours. The dough can be used right away or stored in an airtight container in the refrigerator for up to two weeks.

Step 3: Dust pizza peel with a thin layer of cornmeal. Take a grapefruit-sized amount of dough out of the bowl and shape into ball. NOTE: At this point you incorporate some dried fruit, herbs or other ingredients as you gently shape the dough into a ball. I’ve found the easiest way is to flatten the dough, sprinkle my ingredients over the top and then fold the dough in half a couple of times as I work the ingredients in.

Step 4: Place dough onto pizza peel, dust top with flour and let rise for 40 minutes (or 90 minutes if refrigerated). You may want to loosely cover dough with a kitchen towel or place a large bowl over the top so the dough doesn’t dry out.

Step 5: Twenty minutes before dough is finished rising, place baking stone on the middle rack of the oven and a metal broiler pan (or something similar) on the bottom rack. Preheat oven to 450 degrees.

Step 6: Make a few cuts in the top of the dough with a serrated knife (for decoration and to control where the crust will crack as the bread is baking) and gently slide the dough onto the baking stone in the oven.

Step 7: Quickly pour a cup of water into the pan on the bottom rack and close the oven to capture as much steam as possible inside the oven. Bake at 450 degrees for 20-30 minutes, or until the crust is golden brown. Let bread cool for at least 15-20 minutes before cutting.


Monday, May 12, 2008

May 2008 ROM - Better Refried Beans

Better Refried Beans

This recipe was originally inspired by a tasty bean dip that is served at a couple of mexican restaurants in Las Vegas. We always loved eating the dip at the restaurants so (big surprise) I figured out how to make it at home. This makes a GREAT chip dip or can be used pretty much anywhere in the place of standard refried beans. The recipe is so dead simple to make and so much better than refried beans most people use straight out of a can. All you have to do is take the extra couple of minutes to turn something ordinary into something really great...you won't be sorry.

Ingredients:
Two 14 oz. cans of ranch-style beans
¼ cup sour cream
¼ cup shredded cheddar cheese
1-2 Tbsp. brown sugar
Salt and pepper to taste

Optional ingredients:
Hot sauce to taste
¼ cup salsa
Substitute one can of black beans in place of one of the cans of ranch-style beans
Canned or bottled jalapenos, finely chopped, to taste

Cooking instructions:
Step 1: Drain off most of the liquid from the beans (if using black beans, drain AND rinse thoroughly before using). Place beans in sauce pan, mash with potato masher until chunky, and bring to a simmer over medium heat.

Step 2: Add sour cream, cheese, brown sugar and cook over medium-low heat for 10-15 minutes, stirring occasionally, until mixture has reduced and slightly thickened. Add salt and pepper (and hot sauce, salsa or sliced jalapenos) to taste.

Step 3: Remove from heat, transfer to bowl and enjoy.

Tuesday, April 1, 2008

April 2008 ROM - Eclair Sheet Cake

Éclair Sheet Cake

The Approval Committee was honored to recieve this little gem from a real trouble-maker, the one and only Jul-Bug! If you like Eclairs, you will absolutely love this recipe...plus it's a lot easier to make. There may be several similar recipes for Eclair Cake out there on the world-wide web, but this is the only one that has been tested and approved by the Approval Committee. Need I say more?

Give this recipe a try the next time you are planning on having a few people over for some good times and you'll be the talk of the town...plus it will also help minimize the risk of eating the whole thing by yourself (it is deceptively light and addictive)! Keep those recipes coming!

Ingredients:
1 cup water
1 stick butter
1 cup flour
4 eggs
1 8 oz. package cream cheese
3 cups milk
1 large package vanilla instant pudding
1 8 oz. tub Cool Whip
Hershey’s chocolate syrup

Preparation instructions:
Crust:

Step 1: Boil 1 cup water and 1 stick butter, then pour mixture into 1 cup flour and slowly mix in 4 eggs, one at a time.

Step 2: Spread mixture into a large, greased cookie sheet (jelly roll pan). Bake at 325 degrees for approximately 25 minutes, or until golden brown.

Step 3: Remove from oven and let cool completely.

Filling:
Step 1: Add package of cream cheese, 3 cups milk and package of vanilla instant pudding in a blender and blend until smooth.

Step 2: Spread mixture onto cooled crust and allow it to set up a little before spreading 1 thawed package of Cool Whip over the top.

Step 3: Lightly drizzle chocolate syrup over the top of the Cool Whip and refrigerate for 1 hour.

Step 4: Cut into squares and enjoy!

Saturday, March 15, 2008

March 2008 ROM - Dead Simple Salsa

Dead Simple Salsa

Okay kiddies, it doesn’t get much easier than this salsa recipe…but don’t let that fool you! This super-tasty salsa was destined to be a recipe of the month as soon as I tasted it at a fabulous Super Bowl party a few months ago. This recipe comes courtesy of the limited-edition Hyland Family Cookbook and I’ve only made one small change to the original recipe by substituting green onions in the place of regular onions.


Do a test run or two to figure out how much heat (i.e. jalapenos) you prefer and everything else is pretty self-explanatory. The salsa is really fresh and tasty and goes great with chips, tacos, fajitas, eggs, etc. You may never buy store-bought salsa again! Thanks Audrey!


NOTE: We make this recipe with canned or bottled jalapenos instead of fresh. If you'd prefer to use fresh jalapenos, I would recommend slicing, seeding and then roasting them so they are not too overpowering.

Ingredients:
3 or 4 raw green onions, cut into 1/4-inch slices

Two 15 oz. cans diced or stewed tomatoes, drained
½ cup fresh copped cilantro
1-2 Tbsp. white vinegar
1 tsp. garlic powder
1 tsp. salt
2-4 jalapenos, seeded and rinsed


Preparation Instructions:
Step 1: Slice onions and place all ingredients into blender and pulse for about 5-10 seconds. Check salsa for desired taste and/or spiciness and adjust if needed.


Monday, February 11, 2008

February 2008 ROM - Sesame Orange Shrimp


Sesame Orange Shrimp

This month's recipe is simple and tasty...which are both good qualities when you are looking for something new to add to your dinner rotation. The recipe comes straight from the "Everyday Food" cooking show on PBS, and it is so easy to make that I didn't even have to make any changes! The shrimp can be cooked using the same method and then coated in any number of sauces (e.g. Kung Pao, Sweet and Sour, etc.), so just try this as a starter recipe and then find other recipes for sauces that suit your taste. I've also substituted chicken in place of the shrimp (cut into 1-inch cubes) and it works just as well (just cook it a few minutes longer to make sure it's done). Enjoy!


Ingredients:
2 large egg whites
¼ cup cornstarch
¼ cup sesame seeds
Coarse salt and ground pepper
1-½ pounds uncooked medium or large shrimp, peeled
¼ cup vegetable oil, plus more if needed
1 cup fresh orange juice
2 tablespoons soy sauce
1 tablespoon sugar
4 green onions, trimmed and thinly sliced

Instructions:
Step 1: In a large bowl, whisk together egg whites, cornstarch, sesame seeds, 1 teaspoon salt, and 1/2 teaspoon pepper until frothy. Add shrimp, and toss to coat.

Step 2: Heat 1/4 cup oil in a large nonstick skillet over medium-high heat. Working in two or three batches, cook shrimp until golden and crisp, 2 to 3 minutes per side. Transfer to a paper towel-lined plate to drain. Add more oil to skillet if necessary for remaining batches.

Step 3: Wipe skillet with a paper towel. Add orange juice, soy sauce, and sugar. Boil over high heat until syrupy and reduced to about 1/3 cup, 4 to 5 minutes. Return shrimp to skillet; add green onions, and cook until heated through and coated with sauce, about 1 minute.

Step 4: Serve over plain white rice. Makes approximately 2 servings.

Tuesday, January 8, 2008

January 2008 ROM - Stove Top Meatloaf

Stove Top Meatloaf

This recipe comes courtesy of one of my sister's good friends (Nalani). It took about two seconds to realize that this recipe had what it takes to be a TKRC recipe, and that was even before I made it for the first time! As soon as I heard that it used Stove Top stuffing instead of the sawdust-like, ground breadcrumbs that a lot of meatloaf recipes use, I knew we had a winner (it should also be noted that I used to eat Stove Top stuffing by the box when I was growing up because I just love the stuff like crazy...so this was pretty much love at first sight). I made a few minor changes to the original recipe, but nothing too major. This recipe is the definition of comfort food. It is as good as, if not better than, any meatloaf that I have ever tasted in all my 30 years (sorry mom)!

Ingredients:
2 lbs ground beef
1 can tomato soup
1 pkg (6 oz) chicken Stove Top Stuffing Mix (including seasoning packet)
4 eggs, lightly beaten
1 medium onion, finely chopped
1 tsp. dried thyme
1/2 c. chili sauce
1 c. shredded cheese

Cooking Instructions:
Step 1: Mix meat, 1/2 of the can of soup, Stove Top stuffing, eggs, onion, cheese, & thyme together in a large bowl.

Step 2: Divide mixture in half and shape into two oval-shaped loaves (similar to a football or rugby ball).

Step 3: Place loaves side by side (a couple inches apart) on a rimmed cookie sheet that has been lightly sprayed with non-stick cooking spray and bake @ 350 degrees for approximately 30-45 minutes, or until they are nicely browned and reach an internal temperature of about 160 degrees. Rotate cookie sheet half-way through the cooking time to ensure the loaves brown evenly.

Step 4: Combine the remaining half of can of soup with the chili sauce in a small bowl. Remove loaves from the oven and apply an even coating of the tomato mixture over each loaf.

Step 5: Return loaves to oven and cook for another 10 minutes, or until the tomato sauce is slightly browned.

Step 6: Remove from oven, let stand for 10 minutes, and then enjoy the best meatloaf you’ve ever tasted!

Wednesday, December 5, 2007

December 2007 - Cheese Fondue


Semi-Traditional Swiss Cheese Fondue

I lived in Switzerland for a couple of years during the late 1990’s and each winter I would get treated some fantastic fondue dinners. Over the years I naturally developed my own personal preferences regarding what makes a really good cheese fondue.

I call this a “semi-traditional” recipe because most Swiss cheese fondues are made with white wine instead of beer. However, I always thought that fondue made with white wine had an unusual after-taste, so, for me, this recipe was a welcome change. It’s also not entirely traditional because I like to add various fruits and vegetables to dip in the fondue instead of just using chunks of bread. You can change the recipe to add whatever items you think would be good to dip in a pot of piping-hot cheese…but trust me on the pineapple and potatoes recommendation discussed below!

This recipe is based on one that was given to me by some of the best people I have ever met, the Pelly family. I spent some of the most memorable nights of my mission sitting around the Pelly’s dining table, eating great food, listening to good music and taking part in some lively, and always entertaining, discussions. And while Switzerland may be a long way away from where I live now, I always seem to be able to get back there pretty quickly by whipping up a batch of Pelly’s cheese fondue. Although not entirely traditional, to me, this recipe is Switzerland in a pot.

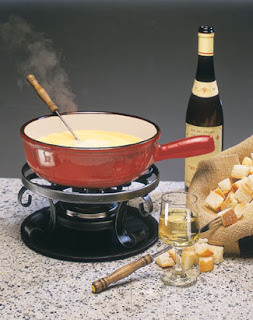
NOTE: This recipe can be made in a large, ceramic fondue pot or non-stick electric fondue pot, whichever you prefer or happen to have handy. The instructions outlined below are for a ceramic fondue pot that is designed to be used on a stove and then transferred to a Sterno burner in the middle of the table to keep warm while eating. A few minor changes will need to be made if using an electric pot.

Should easily serve six hungry people

Ingredients:
1 garlic clove, cut in half
24 oz. beer (I usually get Miller High Life because it’s cheap and does not overpower the cheese)
8 oz. apple beer (optional)
1 pound Emmentaller cheese, grated
1 pound Gruyere cheese, grated
½ pound of either aged white cheddar, appenzeller or vacherin cheese, grated (optional)
2 tablespoon cornstarch, set aside
2 tablespoons cornstarch, dissolved in ½ cup cold water
Generous squeeze of lemon juice to taste
Ground black pepper and nutmeg to taste

Dipping items:
1 loaf of rustic, crusty bread, cut into 1-inch cubes
2-3 pounds boiled Yukon Gold or Red potatoes
1 can of pineapple chunks, drained

Optional dipping items:
Steamed broccoli or cauliflower florets
Grilled bratwurst, sliced into 1/2-inch pieces
Apples or pears, cut into 1-inch pieces

Cooking instructions:
Step 1: Rub garlic all over the interior of the fondue pot. Place garlic, beer, apple beer, lemon juice, black pepper and nutmeg in fondue pot and bring to a boil on stove over medium-high heat. Reduce heat to medium and simmer for approximately 5 minutes, stirring occasionally.

Step 2: Mix the grated cheeses and 2 tablespoons of cornstarch together in a large bowl. Add cheese to fondue pot, one handful at a time, waiting a few minutes until melted. Stir constantly in a figure-8 pattern to incorporate the cheese. Repeat process until all cheese has been slowly added.

Step 3: Once all cheese has been added, continue to stir and let simmer for a few minutes to make sure everythinig is combined. Use the cornstarch and water mixture to bring the fondue to the desired consistency, adding a little at a time and letting the mixture come back up to a boil before adding more. Add additional black pepper and nutmeg to taste.

Step 4: Transfer pot to table and place over a low heat source (like a Sterno burner that is typically used for buffet warming trays) so that it maintains a gentle simmer during the meal.

Step 5: Dip your bread, potatoes, pineapple and other items into cheese and enjoy. Stir cheese occasionally throughout the meal adding additional apple beer, lemon or pineapple juice if the mixture starts to get too thick. Based upon my experience, the best way to enjoy fondue is to place a piece of pineapple with either a piece of bread or potato on the fondue fork and then dip them completely into the cheese. Just try it and you’ll become a believer too!

NOTE: Take care to ensure that an even, golden-brown crust is forming on the bottom of the pot, being mindful of the temperature on heat source so that the cheese does not begin to burn. The Swiss consider this to be a delicacy and is generally peeled off the bottom of the pot and shared with the guests at the conclusion of the meal.

Thursday, November 1, 2007

November 2007 - Brined Roast Turkey

Brined roast turkey with pan gravy

This turkey takes a bit of preparation because you have to start the brine the day before and let the turkey sit in it overnight. You will also need to come up with a way to keep the turkey cool during the brining process (which can be difficult if you don’t have room in your refrigerator or if there isn’t snow outside). However, once you get everything sorted out, it is definitely worth the effort because the brine and herb-butter rub will help give the turkey a fantastic flavor that is hard to achieve otherwise.

I have modified a couple different recipes that I found to come up with what I think is the best brined roasted turkey recipe on the planet. Once you try this recipe you will have a hard time going back to an ordinary roasted turkey. There are a bunch of recipes for brine that are less complicated (i.e. a basic mixture of water, salt and sugar), but I would recommend following this recipe for at least the first time you make it because the ingredients listed below really add a unique flavor to both the turkey and the gravy.

NOTE: Invest $20-30 in a probe-style thermometer that you can leave in the turkey as it roasts. They usually come with a monitor that you connect to the probe so you can keep an eye on the temperature on the outside of the oven. This will also help you coordinate the timing of all the other Thanksgiving food items, setting the table, etc. because you can see how close the turkey’s temperature is to being done and will keep you from overcooking and drying out the bird.

Brine:

1 gallon water
1/2 ounce ground cloves
1/2 ounce ground ginger
4 ounces cracked black peppercorns
12 bay leaves
1 pound coarse kosher salt
24 ounces honey
24 ounces maple syrup

Turkey:
1 whole, 12-18 pound turkey, thawed, with giblets and neck removed

1 stick butter, room temperature
2 teaspoons garlic, minced
1 teaspoon fresh rosemary leaves, finely chopped
2 teaspoons fresh sage leaves, finely chopped
2 apples, quartered and cored
2 onions, peeled and quartered
1 fresh rosemary sprig
6 fresh sage leaves
Olive oil, for drizzling
1 cup carrots, diced

1 cup celery, diced
1 sprig thyme
1 tablespoon flour

Salt and pepper
1 turkey roasting bag

Pan gravy:
Strained roast pan drippings
2 to 4 cups chicken stock
4 tablespoons cornstarch
2 cups cold water
Salt and pepper

Brining the turkey:
Step 1: In a large stockpot, bring ½ gallon of water, cloves, ginger, black peppercorn, bay leaves and salt to a boil. Lower to a simmer and stir in the honey and maple syrup until well blended. Turn off heat, add remaining ½ gallon of water (preferably ice-cold to speed up the cooling process) and allow mixture to cool to room temperature.

Step 2: Rinse the turkey inside and out with cold tap water. Reserve the neck and giblets for pan gravy, if desired. Place the turkey in a clean, extra-large, heavy-duty bag (i.e. food-grade garbage bag or similar) and pour the brine into the bag. Put ice in the bottom of a cooler (or 5-gallon bucket if it is cool enough outside) and then place bag on top of ice. Position the turkey and bag to make sure it is entirely covered with brine. (Note: a large, round drink cooler works well if the turkey is small enough to fit inside because the round drink cooler will keep the bag in a good shape so the turkey stays fully immersed in the brine and it will help keep the brine at a cool temperature.) Remove as much air out of the bag and seal it with a twist tie or knot. Cover top of bag with ice and marinate overnight. Turkey needs to stay as cool as it would be in the refrigerator during the brining process (36-40 degrees).

Roasting the turkey:
Step 1: Preheat oven to 325 degrees F.

Step 2: Remove turkey from brine and rinse thoroughly with water. Mix together the butter, garlic, chopped rosemary, and chopped sage leaves to make a compound butter. Using your hands, loosen the skin from the breast by gently inserting your fingers between the skin and the meat. Rub the compound butter underneath the skin, spreading evenly over entire breast. Repeat same technique for both legs. Insert 1 of the apples and onions, whole rosemary sprig and whole sage leaves into the cavity of the turkey. Tuck the wings back and under the turkey. Using kitchen twine, tie the legs together. This will make a compact shape and will create a great presentation. Drizzle the turkey with olive oil and rub it into the skin.

Step 3: Place the carrots, celery, 1 apple and 1 onion, in the bottom of roasting bag. Shake 1 tablespoon of flour in the roasting bag and then place the turkey inside the roasting bag on top of the vegetables. Cut a couple holes in the top roasting bag to prevent it from bursting. Tent the turkey loosely with aluminum foil and roast at 325 degrees F until it has reached an internal temperature of 160-165 degrees F in the thickest part of the breast (may be 2 1/2 to 4 hours depending on size). Also check the inside of the drumsticks and thighs to verify they have also reached a safe temperature range.

Step4: Transfer turkey to a platter, cover with aluminum foil and allow to rest for 20-30 minutes before carving.

Preparing the pan gravy:

Step 1: Strain the roasting pan drippings and transfer to stock pot. Add 2 to 4 cups of chicken stock to the drippings if additional liquid is needed to make enough gravy (for mashed potatoes, drizzling over turkey meat, etc.). Bring to boil and thicken with the mixture of cornstarch and cold water.

Step 2: To avoid lumps, make sure the cornstarch is mixed really well in the cold water before it is slowly added to the gravy. You can also pour thickening mixture through a fine strainer as you add it to pot. Add the mixture gradually, ½ cup at a time, stirring constantly, and let the gravy come back to a boil for a few moments before adding additional thickening mixture. Stop adding mixture when the desired thickness is reached.

Step 3: Salt and pepper to taste.

Sunday, October 7, 2007

October 2007 - The BEST Sloppy Joes

The BEST Sloppy Joes

To me, Sloppy Joes are one of the great American comfort foods. However, I have never liked the canned or packaged mixes from the grocery store…probably because none of them taste like the ones my mom used to make.
This recipe is based on the Lipton Onion Soup mix recipe for Sloppy Joes. I like using the dry soup mix because it reduces the number of spices & ingredients you need to have on hand and it always turn out great.
This recipe can also be easily adapted to suit anybody’s individual taste. For example: If you like it spicy, add a bit more red pepper flakes and some Crystal Hot Sauce. If you want it to be a little healthier, substitute ground turkey in place of the beef. If you like more vegetables, throw in some diced bell peppers and tomatoes. Whichever style you prefer, just start with this basic recipe and then put your own personal spin on it.

Ingredients:
1 tablespoon olive oil
1 medium yellow onion, diced
1 teaspoon dried red pepper flakes
2 pounds ground beef
1 envelope onion soup mix
1 cup water
1½ cups ketchup
2 tablespoons firmly packed brown sugar
Salt and pepper to taste
8 hamburger buns or deli rolls

Optional:
1 tablespoon Crystal Hot Sauce
1 bell pepper, stemmed, seeded and diced
1 can diced tomatoes or 2 diced fresh tomatoes

Cooking instructions:
Step 1: Heat oil in large stock pot over medium high heat. Add onions and bell peppers, if desired. Cook until softened and slightly caramelized, approximately 15 minutes. Add red pepper flakes for the last few minutes of cooking.

Step 2: Add ground beef and continue to cook over medium high heat until thoroughly browned, approximately 10 minutes.

Step 3: Reduce to medium heat and add onion soup mix, water, ketchup, brown sugar and hot sauce, if desired. Simmer for approximately 30-45 minutes or until sauce has reduced to desired thickness, stirring occasionally. Season with salt and pepper to taste. Serve on hamburger buns or rolls.

Thursday, September 6, 2007

September 2007 - TK's BBQ Sauce

TK’s BBQ Sauce

A few years ago I threw a bunch of ingredients in a pot in an effort to make a decent homemade BBQ sauce. Specifically, I was trying to make something that was tangy, but less-sweet and not as thick as most of the sauces that are available in the grocery store (e.g. K.C. Masterpiece, etc.). It seemed to be a hit with the guinea pigs, so I’ve been making it ever since (with minor tweaks here and there of course). This recipe is my best recollection of what goes into my basic BBQ sauce, so just start out with this and then "adjust" the sauce to your particular taste after it has cooked and reduced down. The sauce works great on barbequed chicken, hamburgers, steaks (pork or beef)...and especially Dutch-oven ribs!

12 oz. can Dr. Pepper
1 cup ketchup
½ cup apple cider vinegar

3 tablespoons Worcestershire sauce
3 tablespoons steak sauce (e.g. A-1 Steak Sauce)
1 teaspoon onion powder
1 teaspoon garlic powder
1-2 teaspoons red pepper flakes

1 teaspoon black pepper

Step 1: Combine all ingredients together in a medium saucepan and bring to boil over medium heat, stirring frequently.

Step 2: Reduce heat to medium-low and simmer uncovered, stirring occasionally, until sauce is reduced by about half or reaches the desired thickness, approximately 30-45 minutes. Skim off any bubbles that have accumulated with a spoon.

Step 3: Remove from heat, cover saucepan with lid and let stand until sauce is cool enough to pour into a plastic container, approximately 1 hour.


Step 4: Pour sauce through mesh strainer, if desired, into plastic squeeze bottles. Sauce can be stored for several months in the refrigerator.

Tuesday, August 7, 2007

August 2007 - Spinach Souffle Stuffed Chicken


Spinach Soufflé Stuffed Chicken

This recipe comes from the South Beach Diet Cookbook, so it is healthy…but, surprisingly enough, it also tastes fantastic. We have had some problems being able to find the spinach soufflé here in Utah so be sure to stock up on it whenever and wherever you find it. Tami recently found that our local Smith’s grocery store just started to carry it (in the freezer section). I’m usually not a huge fan of cooked spinach but this chicken really is great. Just try it once and I’m sure you’ll be hooked too.


Ingredients:
1 package (12 ounces) Stouffer’s frozen spinach soufflé, not thawed
4 boneless, skinless chicken breasts, pounded to ¼-inch thickness
2 tablespoons extra virgin olive oil
2 cloves garlic, sliced
1 cup chicken broth
2 tablespoons lemon juice
1 teaspoon Dijon mustard
Salt
Ground black pepper
1 tablespoon chopped parsley, for garnish
Slices of lemon, for garnish

Step 1: Preheat the oven to 350 degrees.

Step 2: Cut spinach soufflé crosswise into 4 equal pieces. Top half of each whole chicken breast with one of the pieces of soufflé. Fold the other half of the chicken breast over the soufflé filling and fasten the edges with wooden toothpicks.

Step 3: Place garlic and oil in a large skillet and heat over medium-high heat until garlic is golden (being careful to not burn it). Discard the garlic. Add the chicken breasts to the skillet and cook until browned on both sides.

Step 4: Remove chicken breasts to an oven-safe dish. Bake in the oven for approximately 30 minutes, or until a thermometer inserted into the thickest portion registers 170 degrees and the juices run clear.

Step 5: While the chicken is baking, add the broth, lemon juice, mustard, salt and pepper to the large skillet. Heat to boiling. Reduce the heat to low, cover, and simmer for 20 minutes, or until the sauce is reduced in half.

Step 6: To serve, remove and discard wooden toothpicks. Arrange chicken on warm serving platter and spoon the sauce over the chicken. Garnish with the chopped parsley and lemon slices. Serves 4.

July 2007 - Dutch Oven Ribs

Hello again fellow TKRC members,

With the 4th of July quickly approaching, many of you could be scrambling for a last-minute recipe to appease the hungry masses during your backyard/neighborhood BBQ.

The Approval Committee is pleased to announce that you can have no fear because the TKRC July recipe is here! This inexpensive, easy and delicious recipe is a sure-fire way to win over the hearts and stomachs of your guests…unless they are Birkenstock-wearing, tofu-eating, vegetarian, yoga instructors ~ in which case you are pretty much doomed!

My dad (a.k.a. "RT" or "RTK") has been making these Dutch oven ribs at family gatherings for many years now and they are a consistent crowd-pleaser. In fact, they are so good your tongue will get sad every time you have to swallow.

Git 'er done~

TK


Dutch oven BBQ Pork Ribs

This is a Kendrick family favorite that is often at the top of the request list anytime we have any kind of family gathering at my parents’ house. These ribs are very easy to make and feed at least 6 people for about $15. We have always made the ribs in a heavy, cast iron Dutch oven, but it may also work just as well if the ribs are browned in a large skillet and then slow-cooked in a large crock pot.

NOTE: This recipe is easiest when using a large (approx. 12-inch) Dutch oven that does not have legs (so you can use it directly on the stove). I found my 12-inch, pre-seasoned, cast iron Lodge Dutch oven at IFA for about $30; but you could also opt for a fancy-schmancy Le Creuset enamel-coated Dutch oven (available at Williams-Sonoma or Sur La Table) for around $200-300.

Ingredients:
Approx. 6 lbs country-style boneless pork ribs (get ‘em at Sam’s Club or Costco for about $2 per pound)
2 tablespoons vegetable oil
Salt and pepper
1 bottle of your favorite BBQ sauce

Additional options:
1 onion, peeled and quartered
1 Granny Smith apple, peeled and thinly sliced

Cooking Instructions:
Step 1: Heat oven to 275-300 degrees.

Step 2: Heat oil in large Dutch oven on stove over medium-high heat.

Step 3: Season ribs with salt and pepper. Divide ribs into two or three batches and sear on all sides in the hot Dutch oven, removing each batch after browned. Return all ribs to the Dutch oven after the last batch is finished browning.

Step 3 (optional): Add sliced onion and/or apple to the Dutch oven.

Step 4: Cover tightly with lid and transfer to oven. Cook at 275-300 degrees for at least three to four hours. Add BBQ sauce over top of ribs for the last hour of cooking.

Step 5: Drain off excess liquid that has accumulated before serving. Ribs should be very moist and falling apart.

June 2007 - Chicken Marsala and Roasted Veggies

Ciao TKRC members,

I am pleased to announce the highly-anticipated June 2007 recipe – Chicken Marsala and roasted vegetables! The Approval Committee members have tried this recipe out twice (now that is what I call extensive testing) and claim (unofficially, of course) that it is just as good as what is being served in most Italian restaurants.

If you are one of the many TKRC members who do not usually have a good bottle of sweet Marsala wine on hand, try this recipe out with cooking Marsala wine that can be found in most grocery stores for about $2.50…it is usually located next to the balsamic vinegar. (Note: Salt is added to cooking wine so be sure to not add any additional salt to the chicken or sauce until it is reduced and you are ready to serve.)

I don't really know if this recipe is "authentic", but I do know that it is rather easy to make and tastes great...and that's what makes it a winner in my book!

Buon appetito!

TK


Chicken Marsala and Roasted Vegetables

This Chicken Marsala recipe comes from the America’s Test Kitchen Family Cookbook. The recipe calls for sweet Marsala wine, but I like to use a standard grocery store cooking Marsala wine (preferably the Pompeian brand) because it is cheap, easy to find and turns out great when you add a little honey (I have also substituted bacon in the place of authentic Italian pancetta for some of the same reasons).

Chicken Marsala:
½ cup all-purpose flour
4 boneless, skinless chicken breasts
Salt and pepper
3 tablespoons vegetable oil
3 to 4 slices of bacon, chopped fine
8 ounces white button mushrooms, sliced thin
1 garlic clove, minced
1 teaspoon tomato paste
16 ounces Marsala wine
2 tablespoons honey
1 tablespoon fresh lemon juice
2 tablespoons butter, cut into pieces
2 tablespoons fresh Italian (flat leaf) parsley, minced

Step 1: Adjust oven rack to the middle position and heat oven to 200 degrees. Spread flour in shallow dish.

Step 2: Pound the thicker ends of the chicken breasts with a mallet to even out the thickness of each of the breasts. Pat dry with paper towels, then season lightly with pepper. Dredge both sides of each breast through the flour to coat and shake off any excess.

Step 3: Heat 2 tablespoons of the oil in a 12-inch skillet over medium-high heat until the oil just begins to smoke. Add the chicken and cook until light golden brown on both sides, about 4 minutes per side. Transfer chicken to a plate and keep warm in the oven. (Note: don’t overcook the chicken in the skillet because it will continue to cook slowly in the oven)

Step 4: Add bacon and mushrooms and cook until the bacon is crisp and the mushrooms are browned, about 10 minutes.

Step 5: Stir in garlic and tomato paste. Cook until tomato paste begins to brown, about 1-2 minutes. Stir in the Marsala and honey, scaping up any browned bits, and simmer until reduced and slightly syrupy, about 8 minutes.

Step 6: Stir in the lemon juice and any accumulated drippings from the chicken breasts. Turn the heat to low and whisk in butter, one piece at time. Turn off heat and stir in the parsley and season with salt and pepper to taste. Add additional honey if desired. Place chicken breasts on a large platter and cover with the sauce. Serve with roasted vegetables (recipe follows) or over bow-tie pasta.

Roasted Vegetables:
1 ½ pounds red potatoes, cut into ¾-inch wedges
2 to 3 bell peppers, cut into 1-inch slices
1 cup baby carrots
3 to 4 tablespoons olive oil
Salt and pepper

Step 1: Adjust oven rack to the middle position and heat oven to 425 degrees. Toss vegetables in oil and season with salt and pepper to taste. Arrange vegetables in a single layer on a rimmed baking sheet. Cover with foil and roast for 20 minutes.

Step 2: Remove foil, flip the vegetables with a spatula and continue to roast until vegetables are slightly crusty and golden brown on one side, about 15 minutes. Flip vegetables one more time and roast for about 10 more minutes, or until browned.

May 2007 - Beer-simmered Brats and Rotkohl

"Guten Tag" TKRC members!

It seems that the Approval Committee was feeling generous this month. In preparation for the upcoming summer BBQ season, they have authorized me to send out two German-based recipes that go quite well together. Be a little adventurous, put on your best "Lederhosen", crank up the German folk music and give these recipes a try!

WARNING: The Approval Committee has become aware that the "Beer-Simmered Bratwurst Recipe" actually calls for a liquid ingredient that Germans refer to as "beer". TKRC scientists have represented to the Approval Committee that any "beer residue" left in the bratwurst from the boiling process will be burnt off when they are finished off on the grill.

Any TKRC member opposed to buying beer may choose to substitute something else in its place ( e.g. chicken stock, apple beer, etc.); however, changing such a key ingredient releases the TKRC Board of Directors and Approval Committee from any and all written and/or implied tastiness guarantees.

The Approval Committee realizes that some TKRC members may feel uneasy about buying beer. It is recommended that these members mitigate such feelings by telling everybody who looks at them "funny" in the grocery store that they "plan on cooking with the beer and SURE AS HECK don't intend on drinking it" (this may be unnecessary for TKRC members not currently living in Utah). This practice may be used as often as deemed necessary.

Until next month the entire TKRC staff wishes you a heartfelt "ALLES GUTE!"
TK


Beer-Simmered Bratwurst with Onions and Red
Cabbage Sauerkraut (Rot kohl)

This is a great recipe when you are looking to do something a little different at your next backyard BBQ. Don’t worry if you have not been a previous fan of sauerkraut…the rot kohl is sweet and tangy and is perfect with grilled bratwurst. HINT: If you want to serve the rot kohl as a side dish then try a little less vinegar (1/2 cup of each); if you are serving it on top of the bratwurst (in a bun) then I’d recommend following the recipe as shown (1 cup of each). Either way, you can adjust it at the end of the cooking process to suit your taste by adding a little more vinegar or honey.

Bratwurst:
8 to 12 large bratwurst, pricked with a fork
3 onions, peeled and thinly sliced
2 cloves garlic, minced
2 to 4 bottles of beer
2 cups water (or enough to cover)
1 teaspoon coriander seeds
1 teaspoon caraway seeds
1 teaspoon mustard seeds
1 teaspoon ground ginger
Hot dog or hoagie buns
Whole grain or spicy brown mustard, for garnish
Red Cabbage Sauerkraut, for garnish, recipe follows

Step 1: Preheat grill to medium-high.

Step 2: Arrange the onion slices and garlic along the bottom of a medium stockpot. Place the bratwurst on top and then add the beer, water, coriander, caraway, mustard seeds, and ginger. Bring to a simmer on the stove. Simmer the sausages in the mixture for about 10 minutes. Remove the pan from the heat and let the bratwurst sit in the liquid for 10 minutes.

Step 3: Remove the sausages with a pair of tongs onto a platter. Remove the onions with a slotted spoon and place in a bowl. Grill the sausages until the casings are crisp and golden brown, about 3 to 4 minutes per side.

Step 4: Serve the bratwurst on the buns with the onions, mustard and red cabbage sauerkraut, if desired.

Red Cabbage Sauerkraut (Rot kohl):
2 tablespoons olive oil
1/2 cup apple cider vinegar
1 can chicken stock

2 cups apple juice
4 tablespoons honey

1 teaspoon whole grain mustard
1 clove garlic, minced
1 large head red cabbage, thinly shredded
1 red onion, thinly sliced
Salt and freshly ground pepper

Step 1: In a large stock pot or sauté pan, combine the oil, vinegar, chicken stock, apple juice, and honey over medium heat, cook until dissolved.

Step 2: Add the mustard, garlic, and cabbage and onion. Cover and simmer over medium-low heat until the cabbage is soft, stirring occasionally, about 45 minutes.

Step 3: Uncover and continue to simmer to let any unwanted liquid evaporate. Season with salt and pepper, to taste. Add an additional tablespoon of sugar or honey at the end of cooking if desired.


Warm German Potato Salad

This is based on a Bobby Flay recipe that I have tweaked just enough to pass it off as one of my own. I really like this recipe because it doesn’t seem as “heavy” as classic American potato salad and it reminds me of some of the picnics I attended while living in Southern Germany’s “Black Forest”. It may not be totally authentic, but it’s pretty tasty.

I’ve used several types of potatoes (Russet, Red, Yukon Gold, etc.), and they all work pretty well. I like the Red or Yukon Gold potatoes the best because they don’t seem to fall apart as easily as the Russets. Also, all the Germans that I’ve ever met leave the potatoes whole during the cooking process so the potatoes don’t absorb a lot of water. You may need to cut some of the larger potatoes in half so they cook in the same amount of time as the smaller ones. If you have only have large Russet potatoes you may want to cut all of them in half so they cook a little more quickly.

3 pounds new potatoes, unpeeled
1 yellow onion, quartered
1 red onion, diced
1/2 pound bacon, diced
3/4 cup cider vinegar
1 to 2 tablespoons whole grain mustard
2 tablespoons honey
1/4 cup canola oil
Salt and freshly ground pepper
8 green onions, thinly sliced
1/4 cup chopped fresh parsley leaves

Step 1: Place potatoes in a large pot with the yellow onion and cover with cold water. Bring water to a boil and cook until the potatoes have just become tender (be careful to not overcook the potatoes because they will fall apart too easily when tossed with the dressing). Drain water, discard the onion, and cut the potatoes into cubes when they are cool enough to handle. Place the potatoes in a large bowl and cover to keep warm.

Step 2: Heat a large sauté pan over medium-high heat and cook the bacon until crisp. Remove the bacon with a slotted spoon and drain on a paper towel-lined plate. Add the diced red onion to the rendered bacon fat and cook until slightly caramelized, about 10 minutes. Carefully add the vinegar, mustard and honey and cook for 2 more minutes. Whisk in the canola oil and season with salt and pepper, to taste.

Step 3: Add the hot dressing to the potatoes and toss gently to coat. Fold in the bacon, green onions and parsley and season again with salt and pepper, to taste. Serve warm.